

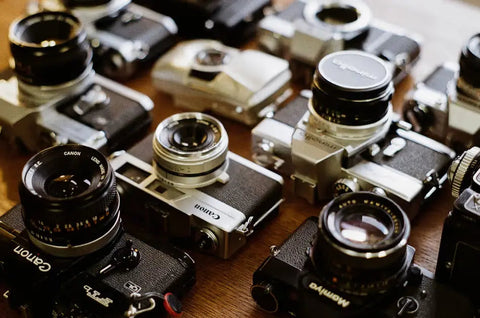
Getting started with film photography: a guide to cameras and techniques
Film photography offers a different photographic experience, slower, more thoughtful, with a unique look. This guide helps you choose your first camera, select the right film, and understand the basics of exposure.
- In summary: a simple and reliable 35mm camera
- A versatile ISO 400 film
- Understand exposure before accumulating gear
 Film photography : a unique rendering, with subtle grain, vibrant texture, and natural colors .
 Choosing your camera : discover the three main families of cameras—compact, SLR, or rangefinder—and find the one that matches your practice.
Why choose film photography: a unique experience
Film photography encourages you to slow down. With a limited number of exposures per roll of film, each image counts more. What may seem restrictive at first often becomes a real asset for improvement: you learn to observe before shooting, compose with more attention, and better read the light.
What this practice concretely brings you:
A recognizable visual aesthetic: fine or more pronounced grain depending on the film, an organic texture, and an often softer color palette
A more direct relationship to shooting: fewer automatisms, more presence in the moment you photograph
A solid technical foundation: exposure, light, composition—you work on the fundamentals that apply to all photography practices
Choosing your film camera: selection and types of cameras for beginners
To start, it's better to choose a reliable and well-built camera than a very sophisticated model. The goal is to learn photography, not to spend your time circumventing equipment limitations. A camera from the 1970s to 1990s can be very suitable. They are often found at reasonable prices, with direct handling and no unnecessary menus.
35mm compact cameras: simplicity and portability for beginners
35mm compact cameras are great if you're looking for a light, discreet, and easy-to-use camera. They allow you to photograph without too many technical questions, which can be reassuring at first.
- Advantages: lightweight, simple to use, often with automatic exposure
- Very suitable for street photography, walks, and travel
- No need to buy multiple lenses; the fixed lens is often sufficient and sometimes very good
Ideal for: urban outings, travel, and spontaneous moments.
35mm SLRs: technical control and interchangeable lenses
35mm SLRs offer an excellent balance between learning and control. You can adjust exposure, change lenses, and concretely understand the effect of depth of field—that is, the sharp area in the image. This is often the most formative choice when you want to progress step by step.
- Advantages: interchangeable lenses, exposure control with manual, aperture-priority, or shutter-priority modes
- More freedom to work with background blur or overall sharpness
- A system that can evolve with you thanks to accessories and lenses
Ideal for: portraits, personal projects, photo series, and gradual learning.
Good to know: fully mechanical SLRs, which operate with little or no battery, are often appreciated for their robustness. However, if you are a beginner, a body with at least one automatic or semi-automatic mode can make it easier to get started. Manual mode remains useful for learning to take control afterward.
Rangefinder cameras: discretion, optical quality, and a different approach
Rangefinder cameras appeal with their compactness, discretion, and often, the quality of their optics. Their use is more particular than with an SLR. Many photographers like this more direct approach, but it requires a little adaptation time.
- Advantages: compact, discreet, often very well-built, with quality optics
- A pleasant shooting experience for discreet photography
- A rendering often appreciated for its character
Ideal for: discreet practice, daily photography, and those who like cameras with a more stripped-down operation.
Technical point: with a rangefinder, you don't look through the lens as you do with an SLR. The image visible in the viewfinder may therefore differ slightly from the one that will be recorded, especially at close distances. It's not necessarily the easiest to start with, even if some feel very comfortable with it.
Discover our selection of cameras:
Choosing your film: ISO 400 selection for beginners
The film largely determines your visual rendering. It influences the colors, contrast, grain, and texture of your photographs. Its choice is therefore important from the very first images.
ISO 400 often offers the best compromise for beginners: it is a versatile, reliable sensitivity suitable for most natural light situations. In 35mm, an ISO 400 film generally produces discreet grain, balanced colors, and that texture specific to film.
Some films to remember to start with:
- Black and white: Ilford HP5, for its balanced contrast and pleasing grain, or Kodak Tri-X, for a more pronounced and vibrant look
- Color: Kodak Portra 400, appreciated for its warm tones and great flexibility, or Fujifilm Superia 400, for its balanced colors and good versatility
 Film rendering: concrete example Here is an example of the typical rendering of a 35mm ISO 400 film: subtle grain, natural colors, and a recognizable texture at first glance.
A simple tip for progress: each manufacturer has its personality. Fujifilm often offers cooler tones, with bluish or pinkish nuances. Kodak readily gives warmer colors. In black and white, Ilford is often appreciated for its strong contrast and good exposure latitude. The most useful thing is to try several references during your learning process to understand what you really like, without immediately turning to the most expensive films.
Consult our selection of films:
Mastering the basics of exposure in film photography: aperture, shutter speed, and ISO
Exposure in film photography relies on three settings: aperture, shutter speed, and ISO. Understanding their relationship helps you photograph with more confidence and better anticipate the result.
Aperture (f/): It determines both the amount of light entering the lens and the depth of field, i.e., the sharp area in the image. A large aperture, such as f/2.8, lets in more light and reduces depth of field. A small aperture, such as f/16, lets in less light and increases the sharp area.
Shutter speed: This corresponds to the time during which light reaches the film. A slow speed, such as 1/30 s, lets in more light but increases the risk of camera shake or motion blur. A fast speed, such as 1/1000 s, lets in less light and allows you to freeze the action.
ISO: In film photography, it depends on the film you have chosen and remains fixed until the end of the roll. An ISO 400 film offers versatile sensitivity, suitable for many situations, with often discreet grain. An ISO 100 film generally produces a finer image but requires more light.
Some simple settings to start in natural light:
- Aperture: f/5.6 to f/8
- Shutter speed: 1/125 s to 1/250 s
- ISO: 400, with an ISO 400 film
This baseline can work in many situations, but not all. In bright sunlight, in the shade, indoors, or on overcast days, the light changes significantly. So, take these values as a starting point, then adjust them according to the scene and the measurement made by your light meter or in-camera meter.
A very useful habit: note down the settings used for each photo. This is a simple and very effective method to understand your results after development. You'll more easily see why an image works, why another is too dense, too light, or blurry, and you'll progress faster.
Learning to meter light: before shooting, take the time to evaluate the scene. With a handheld light meter or your camera's built-in meter, you can check if your aperture-shutter speed combination is consistent with your film's sensitivity. With practice, this reading of light becomes more natural. This is often when film photography becomes more fluid and enjoyable to practice.
Common mistakes when starting with film photography and tips to avoid them
❌ Underexposure / overexposure: learn to meter light and anticipate it. In film photography, exposure matters a lot because you cannot check or correct the image at the time of shooting. Note your settings to understand afterward what worked, or didn't.
❌ Choosing too specific a film too early: initially, stick to a versatile film, often ISO 400. Once you've mastered the basics, you can try other looks and sensitivities. The film that suits you is discovered through practice.
❌ Not noting your settings: this is a real hindrance to your progress. Without notes, you'll struggle to understand why a photo was successful or failed. You progress by observing, comparing, and drawing simple conclusions.
❌ Accumulating too much gear: one camera and one roll of film are more than enough to start. Each additional lens or accessory adds choices, and thus complexity. It's better to master the essentials first.
Essential gear for starting with film: essential accessories
- ✔️ A reliable camera: compact, SLR, or rangefinder
- ✔️ ISO 400 film: in color or black and white
- ✔️ A notebook: to jot down aperture, shutter speed, and light conditions
- ✔️ A case or protection: to protect the camera daily
- ✔️ A carrying bag: practical for your photo outings
The rest—flash, filters, or specialized accessories—can come later, once you have a clearer idea of what you need.
Practical tips for rapid progress in film photography
📌 Shoot in series: photograph the same subject over 12 exposures, in the same light conditions, changing only one setting at a time, for example, aperture or shutter speed. Once the film is developed, compare the results. This is a simple and very effective method for understanding exposure.
📌 Compare your settings: review your notes after each developed roll of film. Which settings yield the most accurate images? Which errors reappear often? This analytical work will help you progress faster than mere chance.
📌 Master one film before changing: stick with the same ISO 400 film for several rolls, for example, ten. You will learn to recognize its rendering, its tolerance, and how it reacts to light. Then, you can compare it with another solid base.
📌 Progress step by step: if your camera allows it, start in automatic mode. Then move to aperture priority, then shutter priority, and finally manual mode. This progression is healthy because it gives you time to understand each setting without getting overwhelmed.
👉 Final tip: take some notes during your reading, then revisit these tips after your first roll of film is developed. At that point, your questions will often be more concrete, and therefore easier to solve.
FAQ: Answers to frequently asked questions for getting started with film photography
Q: Which camera should I choose to start? A 35mm compact or a 35mm SLR are both very good options. 35mm compacts are simple to use, while SLRs offer more control and possibilities for evolution. If you want to progress technically, an SLR is often a better choice. If you're mainly looking to practice without overcomplicating things, a compact is more than enough.
Q: Which film should I choose when starting? An ISO 400 film remains the most balanced choice. For black and white, you can start with Ilford HP5 or Kodak Tri-X. For color, Kodak Portra 400 or Fuji Superia 400 are well-known references. The most useful thing at the beginning is to choose one film, then stick with it for several attempts to fully understand its rendering.
Q: Is it difficult to start with film photography? No, it's not difficult, but the operation is different from digital. You learn to think before you shoot. There's no screen to check the image immediately, nor hundreds of photos to sort through afterward. This constraint often helps you photograph with more attention.
Q: How can I progress quickly? Take your time, note your settings, and carry out test series. In film photography, you progress mainly through observation and analysis. A single well-understood roll of film will often teach you more than ten rolls exposed without a method.
Q: Do I need to invest a lot at the beginning? No. You can start with a used camera between €30 and €100, a roll of film between €6 and €12, then add developing and scanning, often around €6 to €8 per roll. The initial budget is therefore quite affordable. After a few rolls, you'll have a clearer idea of what you really need.
Do you want to start film photography with clarity and confidence? You can consult our selection of restored and guaranteed cameras, as well as our recommended films, to get started on simple and reliable foundations.
- Quick Glossary
- ISO: film's sensitivity to light. The higher the ISO, the more sensitive the film, but the grain often becomes more visible.
- Aperture (f/): size of the diaphragm opening in the lens. The lower the number, such as f/2.8, the wider the aperture and the shallower the depth of field.
- Shutter speed: duration for which the shutter lets in light. The slower the speed, such as 1/30 s, the higher the risk of camera shake and the more motion can appear in the image.
- 35mm: the most common film format, easy to use and often the most affordable. It's a great starting point for analog photography.
- 120: medium format, with a larger negative. It is popular for portraits or studio work, but it costs more and is less accessible for beginners.
- Exposure: amount of light recorded on the film. It depends on the aperture, shutter speed, and ISO.
- Grain: visible texture in the photograph, related to the film used and its sensitivity.
- Rangefinder: a manual focusing system based on a viewfinder window, not direct vision through the lens.